Thursday, May 29, 2014

DISNEY AUTOGRAPH BOOK


Hey Everyone!! Ken here with Ken's Kreations! I am so excited to show today's project. Why?? Well about a month ago I went to Nikki who is the owner of PPBN Designs and asked her if she could make some Mickey heads in the theme of the major Disney characters. The great thing about PPBN Designs is she takes requests and does everything in her power to make those requests into SVG's. She has done this for me on numerous occasions! Well she did it again and made these amazing Mickey Heads in all the major characters so I could make a customer autograph book for a kiddo to get all of his/her favorite characters autographs. 

Here is the completed project all put together. 


I used both my CRICUT EXPLORE and SILHOUETTE CAMEO for this project. Another big player in this project was the The Cinch Binding Machine

I started with the cover. I used my SILHOUETTE CAMEO and the studio software for this Mickey head. I used the amazing print and cut feature for the cover. The cover features an EXCLUSIVE MEMBER SVG file. This MICKEY & MINNIE file was an exclusive release ONLY for the new PPBN Membership Program. CLICK HERE for information on this exclusive program. Using the Mickey Head files I filled the color in with white and placed the PNC file format into the middle of the Mickey Head. The I took the fireworks from the SVG file and made two burst for each ear. Then For the sentiment "My Disney Autograph Book", I downloaded the Waltograph Font from dafont.com. I finished the cover off by using stickles glitter glue in the appropriate colors. 

Below you will find all of the Mickey Heads that you can get for FREE with the PPBN Membership Program. I cut all of these at 5.5" with my CRICUT EXPLORE. I made sure to make a duplicate copy of the base of the Mickey head and mirrored it in white paper. This is adhered to the back of the Mickey head so when you flip the page over it is a place for the character to autograph. (SEE BELOW) After I cut out all the Mickey Heads, I used my  We R Memory Makers Cinch Binding Machine to pierce holes into the ears and cinch together two wire systems to hold the book together. On the left you will see the Mickey Head and on the right you will see the binder version with the mirrored white base where the character has their autograph. It is important to mirror these white base sheets so the line up with the character when you adhere them (THIS IS VERY IMPORTANT FOR PLUTO, DONALD and GOOFY)
M


Here is the We R Memory Makers Cinch Binding Machine I used to bind the book together and a close up on the ears of what it will look like.  I used the 2 and 9 spots to pierce the hole. 


Thanks for taking a look at this magical memory you can make for anyone visiting a Disney park. Make sure to come back soon to see what other Kreations I come up with. 


Below you find all the supplies you will need to make this amazing project. Just click the underline link to be taken to Amazon to find out more information on the product and to purchase it. 

SUPPLY LIST

Wednesday, May 28, 2014

A Slice of Summer!!!

Happy Wednesday!!! Diane here today and  hope everyone enjoyed a wonderful holiday weekend. Memorial Day seems like the right time to kick off the summer season and what better way than eating some juicy watermelon! Today I am sharing PPBN Designs A Slice of Summer svg files.  I used just a few of the images on this layout and can't wait to get a perfect picture for it!!  Be sure to head over to the store and check out all the other great images and be sure to join and get special member rewards!!!
Materials Used:
Machine-Silhouette Cameo
SVG Files-PPBN Designs A Slice of Summer
Cardstock-Michaels
Pattern Paper-Michaels
Stickles and Ribbon

Monday, May 26, 2014

Little Monster card


Welcome to PPbN Designs blog post for this Monday. I made a layout with these monsters last week and this week I made a Birthday card for my grandson. The file can be found here.

 This shows how I laid out the card before I cut the pieces. I did this to make sure all my pieces would fit or if I would have to re-size them. I had a large envelope but no card bases so I just cut a 12 x 12 piece of white cardstock to 12 x 9, scored at 6 inches, and folded. The monsters are on foam dots with Mike on dots thicker than Sulley's. The stamp I used was from a CTMH set I had around. This was a great way to use my scraps from my layout. Thank you for looking.

Wednesday, May 21, 2014

Spring Has Sprung!

Happy Wednesday!!! Diane here sharing another post at PPBN Designs with you today!  I picked the files Spring Has Sprung.  I loved all the elements that came with this set and it made such a cute layout of my little granddaughter smelling her grandfathers roses.  I picked colors that were perfect for the Spring season and this made a great page.  These files can be used for so many different ideas.  Be sure to stop over to the store at www.ppbndesigns.com and check out all the great collections.
Materials Used:
Machine-Silhouette Cameo
Files-Spring Has Sprung-PPBN Designs
Pattern Paper-Hobby Lobby
Cardstock-Michaels and Hobby Lobby
Stickles

Monday, May 19, 2014

Little Monsters 2 page layout


Good morning everyone Janice here with the PPbN Designs blog post for this Monday. I just love this file. All the monsters are so cute and be used individually or as I did on a two page layout.
 I embossed the clouds to give them a little texture. You can find the file on PPbNdesigns.com or here. I think page is ready for some of my grand-monsters pictures hope you enjoy.

Wednesday, May 14, 2014

# 1 DAD CARD

Hey Everyone! Ken here with another Ken's Kreation's. Well now that Mother's Day is over it is time to look ahead to Father's Day. Well my Dad is a huge Seahawk's fan, so this I knew I wanted to feature the Super Bowl hero's somehow. Fortunately PPBN Designs has an amazing kit that features everything Superbowl. You can find this kit by CLICKING HERE. Here is what I came up with using this amazing kit:


For this card I used both the CRICUT EXPLORE and SILHOUETTE CAMEO. It is amazing how well these two machines play together! I used the CRICUT EXPLORE to cut out the desired pieces from the SUPERBOWL SET. This set is grouped together as if you were going to use the scrapbook set, so I had to ungroup and then I designed the entire layout in the Design Space program that comes with the  CRICUT EXPLORE.  I have three base layers for the card. For the base I used the footbal word page from the GUY STACK. The card is 5X7 and then each layer reduces in size by .25. I found the football paper at Joann's in their loose paper section. The trophy is cut from the DCWV metalic stack
The grass, football and helmet are raised at different levels by using 3D FOAM SQUARES and I used my favorite SILVER METALLIC PAINT MARKER for the helmet. For the Seahawk's logo I used my SILHOUETTE CAMEO and imported the logo into my SILHOUETTE STUDIO SOFTWARE so I could trace it. Then using the print and cut feature, I printed it on SILHOUETTE PRINTABLE WHITE STICKER PAPER.
I used my SILHOUETTE CAMEO and SILHOUETTE STUDIO SOFTWARE to design the pennant and the #1 DAD going vertical. I cut this out using the same paper as I used for the mat of the card. I used 3D FOAM SQUARES to raise up the #1 Dad and then I used TIM HOLTZ CRUSHED OLIVER STICKLE to give it a little shine!
To finish off the card I took one of my favorite embellishments and used the same TIM HOLTZ CRUSHED OLIVER STICKLE on them.


PRODUCT DETAILS AND SUPPLY LIST:

TIME: 30 MINUTES
BUY HERE
BUY HERE
BUY HERE
BUY HERE
BUY HERE
BUY HERE
BUY HERE
BUY HERE


Thanks for taking a look at today's Kreations!! If you like this project and want to see more from Ken's Kreations...take a look on how you can support me!

SUPPORT KEN'S KREATIONS - CLICK HERE

Come back real soon to see what other Kreations I come up with!!

Ken


Soccer Time in Spring

Diane here today sharing this two page layout. It's soccer time in Spring in my area, and my little granddaughter is really enjoying it!  I created this two page layout using the PPBN Designs file Girl Soccer Star.  This file is easy and so fun to put together and make an awesome page for your little soccer player.  Stop by the store at www.ppbndesigns.com and pick up this one and many other svg files for all your scrapbook pages!!!
Materials used:
Machine-Silhouette Cameo
SVG files-Girl Soccer Star
Pattern Paper-soccer balls from Michaels
Cardstock-Michaels

Monday, May 12, 2014

Graduation Box Card


Cute School OwlCongrats!

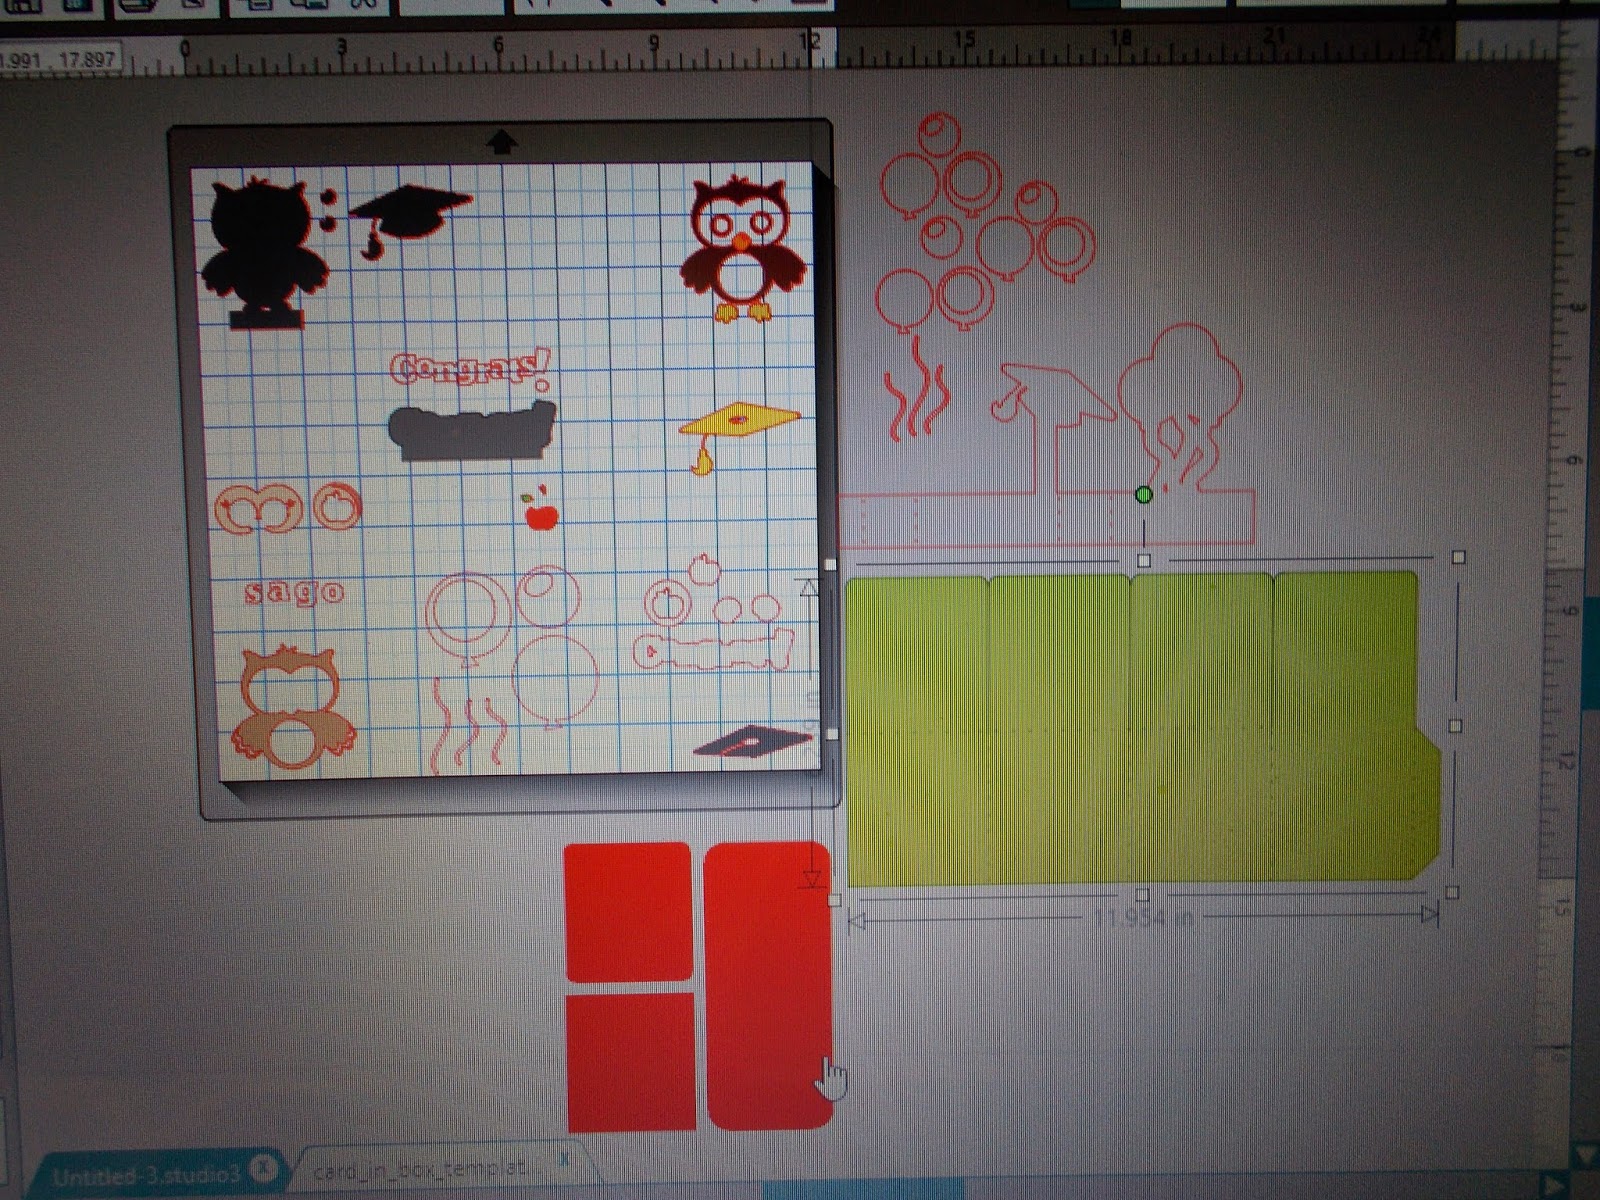
 These are the two files I used to create my box card. I used Ken's file from his blog and added my own shapes. I shrunk all the pieces until they fit in the box.

This is for my niece who is graduating and becoming a teacher so I thought the owl was a good choice for my card. The paper I used was a school pack from Authentique. I love that it was double sided so I could use both sides.
The stamp I used on the top left is from CTMH.
This is how I set up my cut. On the owl in the upper left I added a small box so I had a place to glue the owl to the card. I did this by welding the box shape to his feet area. On the inset I added another another rectangle shape and then the grad. hat shape and I placed the balloons and strings how I wanted to use the and did an offset, then added this where I wanted it on the inset.  I then welded all together. I got rid of some shapes because they were too small just choose the layer I wanted.
 

Wednesday, May 7, 2014

18 BIRTHDAY CARD IN A BOX

Hey Everyone! Ken here with another Ken's Kreation. Well as I said yesterday I am in birthday mode right now with all my projects. About 2 months ago I posted Construction Card In-A-Box. This was a very popular post and file download. So I wanted to use this file again to make a 18 year old Birthday Card using PPBN Files


For this project you need to download the Card-In-The-Box File Below:

SVT, STUDIO, MTC, ADOBE Files Click Here:

CRICUT CRAFT ROOM Click Here:

DESIGN SPACE file Click Here:

Once you have downloaded the file to create the box you need to find the items you will want to decorate your box with. I went with a 18 birthday theme for this card. This particular card was for my niece who just turned 18 and it was the perfect time to use the Birthday Girl Scrapbooking Kit file. This file is set up to make two 12 X 12 scrapbook pages, so i just choose the elements of the kit that I needed. I used my Silhouette Cameo and the Designer Edition Software. For this  project I used the print and cut feature of the Silhouette Cameo.


Here is a close up of all the goodies that I used from the Birthday Girl Scrapbooking Kit file. To give the stars an extra sparkle I used the following stickles colors on the stars: YellowOrange PeelPink TaffetaThistle. I wanted to give the balloons the illusion of floating so I used Grafix Craft Plastic Sheets and glued the balloons to this material. 


For the sides of the box I used the Silhouette Cameo to print and cut the elements that I wanted from the Birthday Girl Scrapbooking Kit. For the pennants I used the same stickle colors that I used on the items in the box (YellowOrange PeelPink TaffetaThistle). I than used Purple Baker's Twine and thread the twine through the pennants. I used 3D Foam Dots on various parts of the project to make the items pop on the card. 

Project Details:
Time: 20 Minutes

Supplies Needed For Project:
Machine: Silhouette Cameo
Design Software: Designer Edition Software
Spend $10 and SAVE 25% on your purchase! Use code L4CQ4XQ0A at checkout! Ends May 31st!

Thanks for taking a look at today's kreations! Come back tomorrow to see what other Kreations I come up with!


First Day of Preschool

Hello and welcome to another great project using the adorable files from PPBN Designs! Diane from www.happyscrapperdiane.blogspot.com sharing this one page layout using the First Day of Preschool svg files.  This was a fun and easy project to put together and makes a super page for the start of your child or grandchild's school album.  I wanted to make it standout so I used the bright primary colors.  Be sure to check out this file and many others for your scrapbooking and craft projects at PPBN Designs
Materials Used:
Machine-Silhouette Cameo
Files-PPBN Designs First Day of Preschool
Pattern Paper-School from Me and My Big Ideas
Cardstock-Michaels
Ribbon-Walmart

Monday, May 5, 2014

Prom Layout

Hello, welcome to the Monday morning blog post from Janice for PPbN Designs. Hope you enjoy this page. Ken showed us one layout last week and I am showing a different layout from the same file.
I used the From This Moment file from PPbN Designs found here. I just choose the pieces I wanted and removed the rest. I duplicated the flowers two times, then separated the pieces by color and sent them to the Cameo. The Prom title I made in Silhouette Design Edition software by typing PROM selecting the font I wanted and then making two off sets for it. I added the pearls from the bride and put pearl studs in the center of the flowers. The mat in the back it just a doily shape I bought from the Sil. online store.
A quick and pretty layout for that special prom picture. Colors can be changed to go with your picture.

Thursday, May 1, 2014

THE NEW NORMAL

Hey Everyone! It is Ken here with another Ken's Kreation. Well I am proud to say that I have been with my partner just shy of 15 years and that is something I am pretty dang proud of. In preparation of our big anniversary I wanted to make a layout and this was the perfect time to use the From This Moment Wedding Set from PPBN designs. This set has all of the wedding party included with the layout. From the Bride and Groom to the ring bearer and flower girl. You can see a picture of the whole set below. Well I took this set and used 2 grooms since this is "My Normal". Here is how it turned out:


I used my Cricut Explore Cutting System to cut all the pieces from the PPBN set. With all of the scrapbook sets from PPBN designs it is important to keep the items grouped together when you size them. In Cricut design space you want to make the entire group sized at 68.7 Width and 35.32 High. This was have all the pieces sized just perfect. I wanted to make the sentiment "The New Normal" in reference to all of the states legalizing gay marriage and it becoming the "new normal". I used my Silhouette Cameo for the sentiment and it is sized at 6.5 inches and i used the offset tool to make the background. 

For the two grooms I used Pearl Stickers for the buttons on their suits. For their shoes I used Black Enamel Accents.


For the sentiment I used Pearl Stickers for the center of the flowers and then behind the sentiment i took some Sew Easy Bakers Twine and wrapped it around a strip of coordinating paper. 


I finished the page of with the husbands rings using REAL diamond (Yeah I wish). I used Adhesive Diamonds to give the rings some sparkles. 

I just loved how this scrapbook page turned out and it will be great to add our picture from our 15 year anniversary!! Here is a list of all the supplies I used and the links to follow to purchase them:

PRODUCT DETAILS / USED:
Time: 25 mins.

Machine: Silhouette Cameo
Adhesive: ATG Gun3D Foam Dots

Well thanks for taking a look at this very personal kreation of mine. Stop by again tomorrow to see what other Kreations that I come up with!!!